Last week we did two 15 mile test drives.
This week I drove 27 miles round trip (without knowing if I'd make it home because
I still don't have my e-meter setup) to my appointment with the
Colorado Motor Vehicle Emissions Technical center, and they signed off a
form DR2365 I needed to get my E type registration/title! I was
pretty nervous, and some things went wrong before I arrived. 6 blocks
away my car lost power due to my old rickety 12v battery dying off
(still no dc/dc converter). So in the parking lot next to the one I
'rolled' into, there was a meineke auto shop which happily stocked and
sold me a new charged battery ($120 later) and I installed it there in
the beautiful Colorado winter sun, and arrived at my appointment three
min early. (with the convertible top down!)
Things that went right?
1) I didn't get pulled over for my 3 month expired temp tag.
2) They signed the form needed.
3) I made it home without running out of electricity in my traction pack!
4) my new battery didn't die.
whew.
did get some video, will post soon.
Wednesday, March 5, 2014
Saturday, February 15, 2014
major issue
Added another motor mount. Let see if vibrations feel better now.
Somewhat major setback occured today when I went for another test drive (with 2 added motor mounts) to see how things felt and listen/watch for vibrations etc. As I was coming home I lost power to the drive train but the motor was still spinning up (but did not over-rev). And was definitely not spinning the trans in neutral either, just zero drag.
I looked through the open hole where the old starter motor used to mount on the trans, and could see that the coupler/clutchplate system was not spinning either, so I guess that means the splines are not stripped. My guess is the coupler slid down the shaft and off of the motor? I was not under heavy power, in fact I may have been coasting somewhat (as I crested a small hill).
I suppose the good news is, nothing sounded like it was breaking or tearing, there was no loud sounds, just lost power while going slow. still a bummer, as I will have to remove the motor at the very least. Possibly also the trans (hopefully not).
Other minor good news, the switches I put in the dash to power up the controller and the contactor are working, plus my rear lights are working. And it was nice I didn't have to tow it back, I was able to roll far (because I took the time to pump up the tires extra firm) small victories.
Other minor bad news I could not get her in reverse, my shifter linkage must not be quite right.
josh
Friday, January 31, 2014
Better Motor Mounts
Motor mount improvements. My two goals were to 1. use ALL the existing/previous mounts in the compartment 2. have at least one mount connect to the large 1/2" bolt called "lift-eye" bolt in the center of the motor which is extremely strong. The other mount on the back of the motor has two holes and is strong also, but it is two aluminum 5/16" screw holes, probably about the same as one 1/2" steel mount. Plus the two spots are entirely separate functional parts of the motor, so I guess technically if the motor fell apart within itself both major pieces would remain connected to the frame? Seems like a remote bonus, hah.
Total of 4 mounts are in use now, two for motor and two for transmission. Since the motor and transmission are very secure together as one unit due to the plate and 5 bolts, the entire assembly has 4 mounts.
Total of 4 mounts are in use now, two for motor and two for transmission. Since the motor and transmission are very secure together as one unit due to the plate and 5 bolts, the entire assembly has 4 mounts.
 |
| Front motor mount, seems flimsy by itself but it provides front to back strength, an area which the other new mount is weakest in. Has some rubber on the motor connecting bolt (eye-lift bolt) |
 |
| This new motor mount is the strongest one and provides very strong side to side and up/down strength, has a small amount of rubber in there somewhere. |
 |
| Bottom show of strongest mount. |
 |
| This is an old shot of the wiring getting finished up from the controller to motor, the wood block is just to keep them from flopping around. |
Wednesday, January 15, 2014
HV wires
A few days ago Jori and I added to the rear compartment wood setup to
get things nice and sturdy with tie-downs. It isn't final but will be
good for test drives, etc. Very importantly we reassembled the brake system which I inadvertantly took apart, this was a pending item of doom and now is back to normal. I'm hoping I can do a test drive without the electric vacuum assist pump installed, but we shall see. If I go down my drive way and have nothing but E brake then I'll have to put her in reverse!
And I did another long cut on the aluminum plate adapter up front. Even though it's fully installed I was able to use the reciprocating saw to shave off another slice to make it fit better in there. That cut is a pain but I'm getting better at it, and thinner shorter metal blades help too.
(last night I sewed some boxers using some light blue 50/50 cotton/linen fabric that I ordered up a few months ago, I really was too lazy to do laundry, so instead I spent 3 hours at the sewing machine? but they fell good! Jori got pics of me standing at the sewing machine with only a tee shirt on)
 |
| Not all batteries are in at this point, just getting them in there roughly |
 |
| running the HV wires up the side, same route as the large pack of wires that normally go from the dash to the rear lights |
 |
| Heavy frame bar that provides a nice safety brace for the batteries (which will eventually be in a strong closed box) |
And I did another long cut on the aluminum plate adapter up front. Even though it's fully installed I was able to use the reciprocating saw to shave off another slice to make it fit better in there. That cut is a pain but I'm getting better at it, and thinner shorter metal blades help too.
Today! was good (and still is) Firstly
I drained the gas, still had 2 gallons so that was a smelly process. I
removed the filler system/inlet and all the wiring and sensors for the gas
tank measurements, etc. I loosened the tank itself but didn't get it
all the way out, there must be some tricks to getting it out, mainly I
just needed it empty so it doesn't pose a hazard and I cut all the
cables and metal hoses out of the car having to do with fuel altogether.
 |
| Secondly I ran the big 2/0 gauge HV wires (welding cable) from the back to front, through the firewall which is tricky without removing the dash, but I think I have it worked out. |
This cold season and the New Years trip to Vegas by car (gas powered Camry) slowed progress down some, but we are back at it.
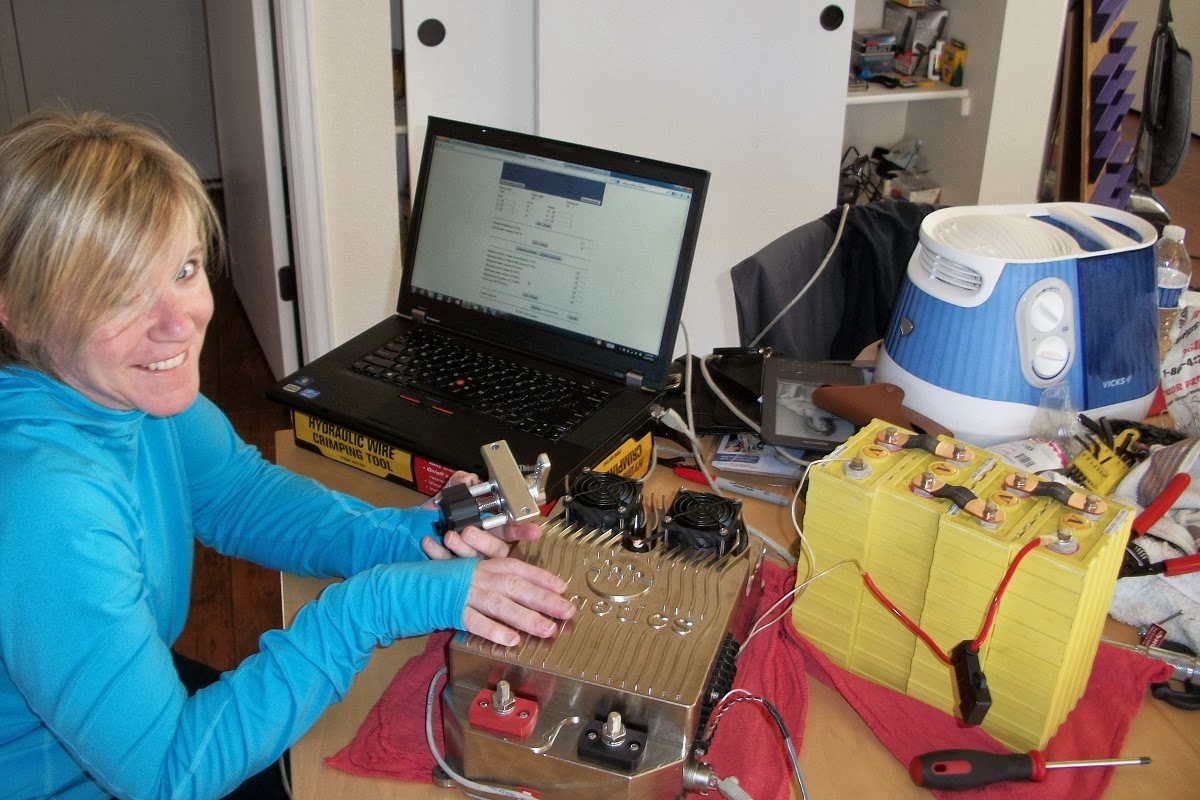
A few weeks back I finally got things straightened out with my Elcon charger, the Orion BMS, the serial CANBUS interface between the two, and the bank of batteries. Everything setup on my kitchen table with 50+ wires going all over the place, I got a full charge on my batteries with a real time visual on each battery as they balanced, etc. A full charge is nice so I can do a test drive without yet installing the BMS or Charger into the car.
While my parents were in town over Christmas my Mom helped me build up the trunk area with wood for supporting the batteries. It's nice there is a very thick and tall heavy duty steel support directly behind the rear seats that provides a nice safe way to keep batteries separate from people in the case of an auto accident. We also brewed up 5 gallons of stout which is now in the bottling stage. yummy! (pictures coming)
Monday, December 2, 2013
motor mount and axles in!
We used 3 existing motor mounts, one of them with a steel strap from hdepot, the others use the original mount hardware because they are attached to the trans. Right now the trans has 2 mounts, the aluminum plate has 1 and the motor itself has 1. Since the plate/trans/motor are in a way 1 single unit (they are NOT coming apart and they have zero independent movement from each other) it means 4 mounts for the assembly, but I still want a 5th mount that will be on the motor as well. I'd like to attach some angle steel to the main lifteye bolt socket on the motor, it is the strongest mounting point of the motor and since it is right in the center of the engine compartment I could use that cross member to carry weight of things on top as well. Just thinking anyway.
 |
| Terrible picture but it shows the axle boot once attached, also... *frown* the partial shot of a c-clamp which is currently holding the brake vacuum res together which never needed to be taken apart, and also brake master cylinder *thingy* which has no fluid resevoir connected, that also never needed to be dismantled. by me messing with them they are now pending items, grr. |
 |
| Layed in some boards and some plywood that came with the batteries shipping box. Just to get some possibilities going on the fit. |
 |
| Movement became reality as I surprised myself with this by placing these items in there "just to see" |
 |
| I'm not too keen on the controller being so close to the grill, but it will have to be shielded with some sheet metal if it were to stay there, which I doubt it will. The Orion BMS is next to the batteries and could be swapped with the controller since it has no moving parts and probably generates less heat. |
lowered engine/tranny inside etc.

best dog ever

It ended up being harder to get situated than I would have expected.
 |
| pressure washer, kind of a nightmare to hook up since I wanted to use hot water from my hot water heater, and my hose from the front yard was still frozen and this thing kinda leaks water everywhere and it plugs into 110v and the on switch is down at the bottom where you feel you are about to get electrocuted, but I used it and it worked, still I don't think they are worth the trouble. |

 |
| This saw fest went really well, very easy compared to sawing the 1/2 aluminum which sucks. Had to saw the exhaust off finally because it was dragging and I couldn't push the car back into the garage :( |
 And the completed work bench, or whatever it is supposed to be. rolling cart?
Subscribe to:
Posts (Atom)